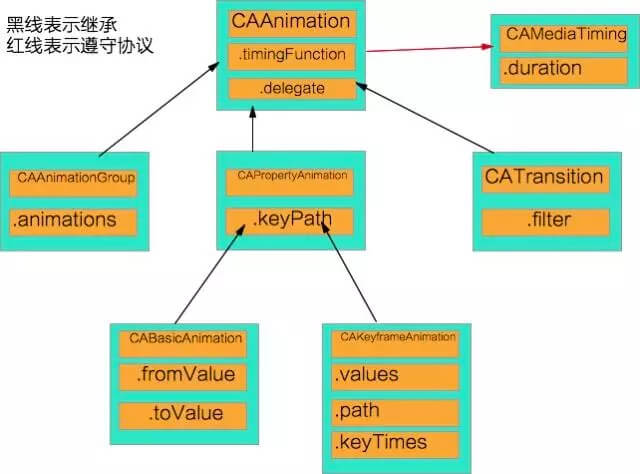
文章目录
  1. 1. CoreAnimation 简介
    1. 1.1. 基本概念
    2. 1.2. UIView 与CALayer的结构关系
    3. 1.3. 核心动画与UIView动画的区别
    4. 1.4. CAAnimation
  2. 2. CAAnimation 子类
    1. 2.1. 关键帧动画
    2. 2.2. 动画组
    3. 2.3. 转场动画
  3. 3. 实际应用
    1. 3.1. CABasicAnimation
    2. 3.2. 按照路径移动
    3. 3.3. 抖动
    4. 3.4. 渐变图层
    5. 3.5. 复制图层 CAReplicatorLayer

CoreAnimation 简介

基本概念

  • CoreAnimation 可用在 Mac OS X和iOS平台
  • CoreAnimation 的动画执行过程都是在后台操作的,不会阻塞主线程。
  • CoreAnimation 是直接作用在CALayer 上的,并不是UIView。

用一张图来简要介绍一下核心动画成员之间的关系。

关于Animation 的架构

UIView 与CALayer的结构关系

1
2
3
4
5
6
7
8
9
10
CoreAnimation 基础框架
CALayer 图层(动画都是基于图层产生的)
CALayer 不可以与用户交互,只能显示内容
CALayer 发生改变,子图层 不会跟随发生改变
UIView 是一个视图,可以添加响应事件,可以与用户交互
UIView —>rootLayer 发生改变,子图层也会发生改变
例如:UIButton ,不止有一个视图,改变的只是其中一个视图的rootLayer —>仍然会显示未被裁切的边框
为何要封装成这么多的类?
体现了面向对象的特性,就是每个对象都控制着不同的特性,每个类控制动画一方面。

核心动画与UIView动画的区别

1
2
3
4
5
核心动画的一切都是假象,并不会真是改变layer的值
UIView 真实改变属性才能有动画
使用场景:
UIView 用在需要交互的地方
核心动画用在不需要交互的地方。

CAAnimation

1
2
3
4
5
6
7
8
9
10
11
12
13
14
15
16
17
18
19
20
21
22
23
24
25
26
27
28
29
30
31
32
33
34
35
36
37
38
39
基础框架
CALayer 图层(动画都是基于图层产生的)
自带动画效果(当属性值改变的时候)—> 隐式动画
UIView 是一个视图,可以添加响应事件,可以与用户交互,他的rootLayer没有动画效果
CALayer 不可以与用户交互,只能显示内容
bounds 边境范围
position 中心点
zPosition z轴中心点
anchorPoint 锚点 ✮✮✮✮✮
默认锚点 是与中心点重合
锚点的值与位置
最小值是(0,0),最大值是(1,1)
默认锚点的值是(0.5,0.5)= 中心点
(0,0) = 图层的左上角
(0,1) = 图层的左下角
(1,0) = 图层的右上角
(1,1) = 图层的右下角
锚点值 = 锚点在视图上的位置.x.y/视图的宽高
当视图改变的时候,是以锚点为基准改变的
anchorPointZ Z轴锚点
transform 转换形态
frame NO. Animatable 坐标
hidden 隐藏
doubleSided 图层背面是否显示
geometryFlipped 翻转 颠倒
masksToBounds 裁切边境
contents 内容
opaque 不透明度
allowsEdgeAntialiasing 是否使用 变形后的抗锯齿
backgroundColor 背景颜色
borderWidth 边框宽
borderColor 边框颜色
opacity 不透明度
shadowColor 阴影颜色
shadowOpacity 阴影不透明度
rasterizationScale 防止Retina屏幕像素化
shadowOffset 阴影偏移量
shadowRadius 阴影的半径

CAAnimation 子类

关键帧动画

1
2
3
4
5
6
7
8
CAKeyframeAnimation 简介
关键帧动画,是CAPropertyAnimation的子类
与 CABasicAniamtion 的区别是CABasicAniamtion是从fromValue 到toValue 两个值的变化,而 CAKeyframeAnimation 可以使用 NSArray 来保存这些数值。
属性说明:
values:NSArray 对象,里面的元素就是“关键帧”,动画会在指定的时间内,依次显示 values 数组中的每一个关键帧。
path:可以设置CGPathRef、CGMutablePathRef,让图层按照轨迹移动,path只对CALayer的 anchorPoint 和 point 起作用。如果设置了path, 那么values将被忽略。
keyTimes:关键帧指定对应的时间点,取值范围从0~1,keyTimes中的每一个时间值对应values中的每一帧,如果没有设置,时间是平分的。
CABasicAniamtion 可看做 只有两个关键帧的CAKeyframeAnimation

动画组

1
2
3
4
5
CAAnimationGroup
是 CAAnimation 的子类,可以保存一组动画对象,将 CAAnimationGroup 对象加入层之后,族中所有的动画对象可以同时并发运行。
属性说明:
animations:保存一组动画对象的NSArray。
默认情况下,一组动画对象是同时运行的,也可以通过设置动画对象的 beginTimer 属性来更改动画的开始时间。

转场动画

1
2
3
4
5
6
7
8
9
10
11
12
13
14
15
16
17
18
19
20
21
22
23
24
25
26
27
28
29
30
31
32
33
34
35
36
37
38
39
40
41
42
43
44
45
46
47
48
49
50
51
52
53
54
55
56
57
58
59
60
61
62
63
64
65
66
67
68
69
70
71
72
73
74
75
76
77
78
79
80
81
82
83
84
85
86
87
88
89
90
91
92
93
94
95
96
97
98
99
100
101
102
103
104
105
106
107
108
109
110
111
112
113
114
CATransition
为层提供移出屏幕和移入屏幕的动画效果。
UINavigationController就是通过CATransition实现了将控制器推入屏幕的动画效果
动画属性:
type:动画过渡类型
subtype:动画过渡方向
startProgress:动画起点
endProgress:动画终点
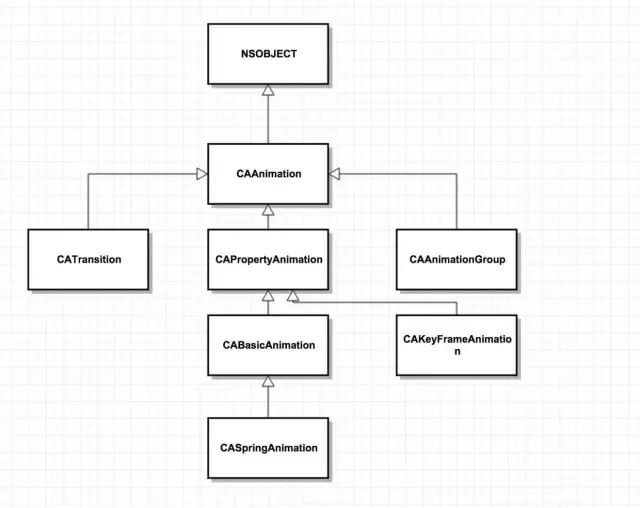
CAAnimation (基类)所有动画的父类,不能直接使用
CAPropertyAnimation (属性动画)也是基类,不可直接使用—>通过属性值的改变产生动画效果
CABasicAnimation (基础动画)只能是两个点之间的变化
CASpringAnimation
CAKeyFrameAnimation (关键帧动画)可以添加多个点的变化 或者路径
CAAnimationGRoup(动画组)可以同时添加多种动画,达到预期效果
CATransition(转场动画 )给视图切换的时候 添加动画效果
```
### 代码示例
```objc
#import "ViewController.h"
#define Angle(a) (a)*M_PI/180
#define sAngle 6 //每秒旋转多少度:sAngle*N秒*M_PI/180
@interface ViewController (){
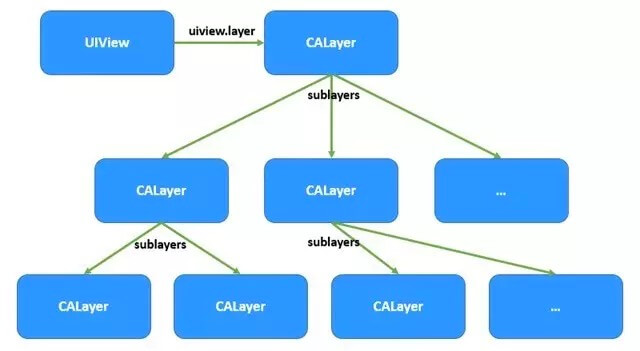
CALayer *layer;
}
@property (nonatomic,strong)CALayer *pointLayer;
@end
@implementation ViewController
- (void)viewDidLoad {
[super viewDidLoad];
//初始化CAlayer
layer = [CALayer layer];
layer.frame = CGRectMake(100, 100, 100, 100);
//设置图层拐角
layer.cornerRadius = 100/2;
layer.backgroundColor =[UIColor brownColor].CGColor;
//添加到父图层
[self.view.layer addSublayer:layer];
NSLog(@"%@",self.pointLayer);
_pointLayer.anchorPoint =CGPointMake(0, 0.5);
//放置一张图片
/*
图层上 要的是颜色(CGColorRef) 图片(CGImageRef)的 数据,而非UI
*/
_pointLayer.contents =(id)[UIImage imageNamed:@"shizhen.png"].CGImage;
self.pointLayer.anchorPoint = CGPointMake(0.5, 0.9);
[self star];
[NSTimer scheduledTimerWithTimeInterval:1
target:self selector:@selector(star) userInfo:nil repeats:YES];
}
-(void)touchesBegan:(NSSet<UITouch *> *)touches withEvent:(UIEvent *)event{
//获得点击触摸的点
layer.position =[[touches anyObject] locationInView:self.view];
CGFloat width =CGRectGetWidth(layer.bounds)!=100?100:50;
//通过获得的点 改变尺寸
layer.bounds =CGRectMake(0, 0, width, width);
//改变颜色
CGColorRef color = [UIColor brownColor].CGColor != layer.backgroundColor ?
[UIColor brownColor].CGColor:
[UIColor colorWithRed:0.863
green:0.634
blue:0.490
alpha:1.000].CGColor;
layer.backgroundColor = color;
//改变半径
layer.cornerRadius =width!=100?0:width/2;
//改变透明度
layer.opacity = 0.3;
//设置锚点,最大值是1,最小值是0
_pointLayer.transform = CATransform3DMakeRotation(/*弧度*/Angle(60),0 , 0, 1);
}
-(void)touchesEnded:(NSSet<UITouch *> *)touches withEvent:(UIEvent *)event{
layer.opacity = 1.0;
//还原
_pointLayer.transform = CATransform3DIdentity;
}
//利用懒加载 创建一个layer
-(CALayer *)pointLayer{
if (_pointLayer) {
return _pointLayer;
}
_pointLayer = [CALayer layer];
_pointLayer.bounds =CGRectMake(0, 0, 18, 220);
//设置中心点
_pointLayer.position =self.view.center;
_pointLayer.backgroundColor =
[UIColor colorWithRed:1.000
green:0.392
blue:0.929
alpha:1.000].CGColor;
[self.view.layer addSublayer:_pointLayer];
return _pointLayer;
}
-(void)star{
//NSCalendar 日历;可以获得年月日 时分秒,都是NSCalendar上的组件
// NSDateComponents
//获得当前日历
NSCalendar *calender =[NSCalendar currentCalendar];
NSDateComponents *componest =[calender components:
NSCalendarUnitHour|
NSCalendarUnitMinute|
NSCalendarUnitSecond fromDate:[NSDate date]];
float s = componest.second * sAngle;
_pointLayer.transform = CATransform3DMakeRotation(/*弧度*/Angle(s),0 , 0, 1);
}

实际应用

CABasicAnimation

1
2
3
4
5
6
7
8
9
CABasicAnimation *ani3 = [CABasicAnimation animation];
ani3.keyPath = @"opacity";
ani3.fromValue = @1;
ani3.toValue = @0;
ani3.duration = 1;
ani3.repeatCount = MAXFLOAT;
ani3.removedOnCompletion = NO;
ani3.fillMode = kCAFillModeBackwards;
CAKeyframeAnimation

按照路径移动

1
2
3
4
5
6
7
8
CAKeyframeAnimation* ani = [CAKeyframeAnimation animation];
ani.keyPath = @"position";
UIBezierPath *path =[UIBezierPath bezierPathWithArcCenter:_img.center radius:100 startAngle:0 endAngle:M_PI*2 clockwise:YES];
ani.path = path.CGPath;
ani.repeatCount = MAXFLOAT;
ani.duration = 2;
ani.removedOnCompletion = NO;
ani.fillMode = kCAFillModeBoth;

抖动

1
2
3
4
5
6
7
8
9
10
11
12
13
14
15
16
17
18
19
20
21
22
23
24
25
26
27
28
29
30
31
32
33
34
35
36
37
38
39
40
41
42
43
44
45
46
47
48
49
50
51
52
53
54
55
56
57
58
59
60
61
62
63
64
65
66
67
#define angle2Radion(angle) (angle / 180.0 * M_PI)
CAKeyframeAnimation*ani2 = [CAKeyframeAnimation animation];
ani2.keyPath = @"transform.rotation";
ani2.values = @[@(angle2Radion(-5)),@(angle2Radion(5)),@(angle2Radion(-5))];
ani2.duration = 0.15;
ani2.repeatCount = MAXFLOAT;
CAAnimationGroup
/*注意:每一次group循环内的动画仍旧是由每个动画各自的属性控制,
有一点需要注意就是duration这个属性,为了保证动画的连贯性,
group的duration属性最好设置成与动画数组内时间最长的动画一致。*/
//group
CAAnimationGroup *group = [CAAnimationGroup animation];
//位移
CAKeyframeAnimation* ani = [CAKeyframeAnimation animation];
ani.keyPath = @"position";
UIBezierPath *path =[UIBezierPath bezierPathWithArcCenter:_img.center radius:100
startAngle:0 endAngle:M_PI*2 clockwise:YES];
ani.path = path.CGPath;
ani.repeatCount = MAXFLOAT;
ani.duration = 2;
ani.removedOnCompletion = NO;
ani.fillMode = kCAFillModeBoth;
//抖动
CAKeyframeAnimation*ani2 = [CAKeyframeAnimation animation];
ani2.keyPath = @"transform.rotation";
ani2.values = @[@(angle2Radion(-5)),@(angle2Radion(5)),@(angle2Radion(-5))];
ani2.duration = 0.15;
ani2.repeatCount = MAXFLOAT;
//透明度
CABasicAnimation *ani3 = [CABasicAnimation animation];
ani3.keyPath = @"opacity";
ani3.fromValue = @1;
ani3.toValue = @0;
ani3.duration = 1;
ani3.repeatCount = MAXFLOAT;
ani3.removedOnCompletion = NO;
ani3.fillMode = kCAFillModeBackwards;
//将动画添加进group
group.animations = @[ani,ani2,ani3];
group.duration = 2;
group.repeatCount = MAXFLOAT;
group.removedOnCompletion = NO;
group.fillMode = kCAFillModeBackwards;
[_img.layer addAnimation:group forKey:nil];
CATransition
// 界面切换的代码
static int i = 2;
NSString *imageName = [NSString stringWithFormat:@"%d",i];
_imageView.image = [UIImage imageNamed:imageName];
i++;
if (i > 3) {
i = 1;
}
// 只要切换界面 都可以使用转场动画
// 谁切换界面 就添加到谁上
// 转场动画代码必须和界面切换的代码放在一起
// 转场动画
CATransition *anim = [CATransition animation];
// 指定转场类型
anim.type = @"pageCurl";
// 设置转场的方向
anim.subtype = kCATransitionFromLeft;
// 设置动画的进度
anim.startProgress = 0;
anim.endProgress = 1;
anim.duration = 0.5;
[_imageView.layer addAnimation:anim forKey:nil];

粒子发送器图层

1
2
3
4
5
6
7
8
9
10
11
12
13
14
15
16
17
18
19
20
21
22
23
24
25
26
27
28
29
30
31
32
33
34
35
CAEmitterLayer:发送器
birthRate:每秒发送粒子数量
emitterMode :发送的样式
kCAEmitterLayerPoints:点
kCAEmitterLayerOutline:线
kCAEmitterLayerSurface:面
kCAEmitterLayerVolume:团
kCAEmitterLayerRectangle 矩形
kCAEmitterLayerCuboid 立方体
kCAEmitterLayerCircle 曲线
kCAEmitterLayerSphere 圆形
renderMode渲染样式
kCAEmitterLayerOldestFirst 最后的出生的粒子 在第一个
kCAEmitterLayerOldestLast 最后的出生的粒子 在最后面
kCAEmitterLayerBackToFront 把后面的 放到上面
kCAEmitterLayerAdditive 叠加
kCAEmitterLayerOldestFirst 最后的出生的粒子 在第一个
kCAEmitterLayerOldestLast 最后的出生的粒子 在最后面
kCAEmitterLayerBackToFront 把后面的 放到上面
kCAEmitterLayerAdditive 叠加
emitterCells:在粒子发送器上面 添加粒子
CAEmitterCell:粒子
contents:粒子的内容
lifetime:存活时间
lifetimeRange:存活时间范围
birthRate:每秒粒子生成的数量
emissionLatitude:散发的纬度(方向) 纬度表示 上下
emissionLongitude:散发的经度(方向) 经度表示左右
velocity :发送的速度(速度越快,越远)
velocityRange:发送的速度范围
xAcceleration:X轴加速度
yAcceleration:y轴加速度
zAcceleration:z轴加速度
emissionRange:散发的范围 弧度
name:可以通过名字 找到粒子
1
2
3
4
5
6
7
8
9
10
11
12
13
14
15
16
17
18
19
20
21
22
23
24
25
26
27
28
29
30
31
32
33
34
35
36
37
38
39
40
41
42
43
44
45
- (void)viewDidLoad {
[super viewDidLoad];
//初始化粒子发送器
//self.emitterLayer.frame = CGRectMake(0, 300, 100,400);
// 设置粒子发送器 每秒钟发送的数量
self.emitterLayer.birthRate = 1;
//设置粒子的中心点
//self.emitterLayer.position = CGPointMake(0, 0);
// 设置粒子发送器的样式
self.emitterLayer.renderMode = kCAEmitterLayerBackToFront;
//设置粒子的中心店
self.emitterLayer.emitterPosition =self.view.center;
//初始化粒子
CAEmitterCell *cell = [CAEmitterCell emitterCell];
cell.contents = (id)[UIImage imageNamed:@"H3"].CGImage;
//粒子的出生量
cell.birthRate = 10;
//粒子的存活时间,默认是0,单位是秒
cell.lifetime = 10;
cell.lifetimeRange =11;
//粒子发送的速度,默认是0
cell.velocity = 100;
cell.velocityRange= 10;
//设置粒子发送的 方向
cell.emissionLongitude = 30*M_PI/180;
cell.emissionLatitude = M_PI/180;
//设置粒子散发的范围 弧度
cell.emissionRange = 180*M_PI/180;
//设置粒子的加速度
cell.yAcceleration = -100;
// 把粒子的cell 放到粒子发送器上
self.emitterLayer.emitterCells = @[cell];
}
-(CAEmitterLayer *)emitterLayer{
if (_emitterLayer) {
return _emitterLayer;
}
_emitterLayer =[CAEmitterLayer layer];
[self.view.layer addSublayer:_emitterLayer];
return _emitterLayer;
}

渐变图层

1
2
3
4
5
6
7
8
9
10
11
12
13
14
15
16
17
18
19
20
21
22
23
24
25
26
27
28
29
30
31
CAGradientLayer
colors: 渐变颜色的数组 必须是CGColor类型
locations: 颜色渐变的百分比 数组
startPoint: 颜色渐变的起始点
endPoint:颜色渐变的终点 颜色会根据设置的起始点和终点去变化
```
```objc
self.view.backgroundColor =[UIColor whiteColor];
UIImageView *imageView =[[UIImageView alloc]initWithFrame:self.view.frame];
imageView.contentMode =UIViewContentModeScaleAspectFit;
imageView.image =[UIImage imageNamed:@"H4"];
[self.view addSubview:imageView];
//初始化渐变 图层
CAGradientLayer *layer =[CAGradientLayer layer];
layer.frame =self.view.frame;
//设置渐变的颜色数组
layer.colors =@[(id)[UIColor redColor].CGColor,
(id)[UIColor orangeColor].CGColor,
(id)[UIColor yellowColor].CGColor,
(id)[UIColor greenColor].CGColor,
(id)[UIColor cyanColor].CGColor,
(id)[UIColor blueColor].CGColor,
(id)[UIColor purpleColor].CGColor];
//设置透明度
layer.opacity =0.2;
//设置起始点
layer.startPoint = CGPointMake(0, 0);
//设置
layer.locations =@[@0.1,@0.2,@0.3];
[self.view.layer addSublayer:layer];

复制图层 CAReplicatorLayer

在使用复制图层的时候,必须重写layerClass,把原有的CALayer 修改成 CAReplicatorLayer

1
2
3
4
5
6
7
8
9
10
11
12
13
14
15
16
17
18
19
20
21
22
23
//创建重写后 可以复制的图层
CanReplicatorLayer *view= [[CanReplicatorLayer alloc]initWithFrame:
CGRectMake(0, 100, 300, 300)];
[self.view addSubview:view];
self.view.backgroundColor =[UIColor whiteColor];
UIImageView *imageView =[[UIImageView alloc]initWithFrame:
CGRectMake(0, 100, 300, 300)];
imageView.contentMode =UIViewContentModeScaleAspectFit;
imageView.image =[UIImage imageNamed:@"H4"];
[view addSubview:imageView];
//复制图层
CAReplicatorLayer *layer = (CAReplicatorLayer *)view.layer;
//instance 复制之后,有原来的图层 有新的图层,这是现在实例化出来的layer的数量
layer.instanceCount = 2;//复制出来一份
//改变复制图层的样式
CATransform3D tansFrom = CATransform3DMakeTranslation(0, 80, 0);
layer.instanceTransform = CATransform3DRotate(tansFrom,180*M_PI/180, 1, 0, 0);
//设置复制图层 颜色偏移量
layer.instanceRedOffset =-0.2;
layer.instanceBlueOffset = -0.3;
layer.instanceGreenOffset =-0.4;